How to Get Great Digital Color
Every Time in Any Light
By Charlotte K. Lowrie
 If
you shoot with a digital SLR, then you know that one of the advantages
of digital photography is the ability to control the color accuracy of
images. And if you’ve shot digital for awhile, you also know that one of
the disadvantages of digital photography is getting accurate color in
digital images.
If
you shoot with a digital SLR, then you know that one of the advantages
of digital photography is the ability to control the color accuracy of
images. And if you’ve shot digital for awhile, you also know that one of
the disadvantages of digital photography is getting accurate color in
digital images.
And while it’s great not to schlep around a full compliment of
color-conversion filters, or buy film balanced for different types of
light, the process of correcting digital image color can be frustrating
and time consuming.
With the latest digital SLRs, photographers have more control over
in-camera color results, usually via tweaking the camera’s built-in
white balance options, bracketing white-balance settings, or by setting
a custom white balance. While these options are a step forward, the
final color can still be less than perfect, and setting a custom white
balance is disruptive to the flow of shooting in locations where the
light changes frequently.
But gray cards can take the frustration and guess-work out of digital
color correction. These gray cards are not the traditional 18 percent gray cards that are
designed to ensure proper exposure. Instead, white-balance gray cards
are designed to provide an neutral reference point for either RAW or
JPEG images.
New Tools Ensure Accurate
Digital Color
'Gray' cards, such as the
WhiBal™ White
Balance Reference Card from RawWorkflow.com, are
specifically designed to render accurate color by providing a neutral
white-balance reference point that is used during image-editing to
color-correct images.
“The WhiBal card tells the RAW Converter or editing software what color
the light was at the time of shooting,” explains Michael Tapes, owner of
RawWorkflow.com and inventor of
the WhiBal cards. While it seems logical that a single color temperature
would be the easiest and most accurate solution to getting accurate
color, Tapes says that the traditional Kelvin color temperature scale is
not the definitive solution.
“You can't define the color of light with one number,” Tapes says. “The
Kelvin scale is used as a point of reference in digital
photography;—something that we can all get our heads around, but every
RAW converter looks at specific degrees Kelvin differently. So the
Kelvin scale is close, but it is not perfect, and it's subject to
interpretation. That’s why good RAW conversion programs have both
temperature and tint settings, and that's why these numbers do not agree
from program to program.”
A neutral reference point can help circumvent the different interpretations presented by in-camera processors and RAW conversion programs. But for white-balance reference gray cards to be effective, neutrality is critical. And that's not necessarily an easy task nor one that stays consistent from one batch of card material to the next batch. To develop the WhiBal cards, Tapes says that the company did exhaustive research to find stable material that would be neutral and that would:
-
Maintain spectral neutral regardless of light source and under all reasonable temperature and environmental conditions
-
Not respond differently to UV light than they do to the visible spectrum of light
-
Provide a gray luminance value that is in the range for most digital cameras.
-
Not be damaged by dropping, scuffing, moisture, etc.
-
Last a “lifetime”
-
Float in water
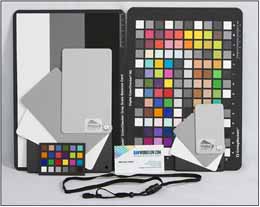 In fact, WhiBal cards include not only two gray cards, one for RAW capture
and another for JPEG capture, but also a white and black card to set
those respective points during image-conversion or editing. And, as most
photographers know, once an accurate white balance is established, all
of the other colors in the image automatically fall into place. And in
RAW, the white balance is done early in the process using the RAW data
assuring a non-destructive white-balance correction.
In fact, WhiBal cards include not only two gray cards, one for RAW capture
and another for JPEG capture, but also a white and black card to set
those respective points during image-conversion or editing. And, as most
photographers know, once an accurate white balance is established, all
of the other colors in the image automatically fall into place. And in
RAW, the white balance is done early in the process using the RAW data
assuring a non-destructive white-balance correction.
Even if the exposure is off, Tapes points out that either the white card
or one of the two gray cards can be used for proper white balancing.
To ensure that the gray cards would stand up to daily use, Tapes said it
was important to design cards that are durable, fade and scratch
resistant, and waterproof. And to help ensure that the cards are easy to
use, WhiBal cards are hinged at one corner making it easy to quickly fan
them out for the reference picture. And since the cards are the same
size as a business card, they can be dropped into a shirt pocket or
carried around the neck with the supplied lanyard.
And to ensure that the WhiBal card set that each customer receives is
really neutral, Tapes uses a Gretag Macbeth SpectroEye precision
spectrophotometer to measure every card that is shipped, thus ensuring
that each meets the stringent WhiBal specs. The better side of each card
is faced toward the camera (a sticker on the WhiBal card distinguishes
the proper side to face the camera) to assure the best neutrality
possible.
How to Use White Balance
Reference Cards
Using white-balance reference, or “gray” cards is as simple as taking a
picture of the cards in the light that you’re shooting in. When you
finish shooting and begin processing pictures, simply open the picture
of the gray cards, click the gray card in the picture to correct the
color. Then in Adobe Camera Raw (ACR), for example, you save the white
balance as a Settings Subset.
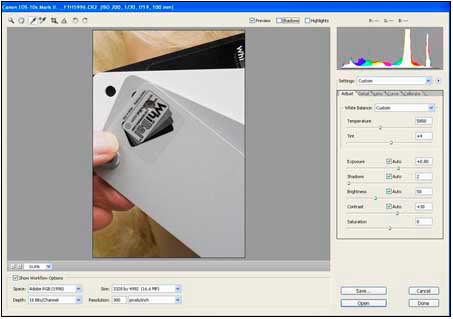
Next, you select all of the images shot under the same light, and then apply the saved setting to them. Using ACR as an example, you select all the images you want, right-click, and then choose the white balance setting that you saved from the list. In a few seconds you can color balance 10, 20, 50 or more images.
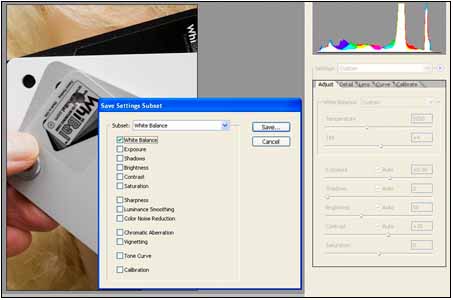
“During this process, we are not
harming the image in any way," Tapes says. "We are not degrading the
image quality, but rather, we are selecting the color balance as if the
camera had done it correctly in the first place."
Note: Some RAW conversion programs do not allow you to select
multiple images and apply settings to all of them. However, you can
correct the first image, save the settings, and then apply the white
balance setting to individual images. This also applies to editing JPEG
images in Photoshop and other image-editing programs.
For photographers who shoot using RAW capture mode, the gray card
eliminates the need to set a custom white balance. In addition, the
WhiBal process is especially handy when shooting portraits, weddings,
indoor sports, and other indoor venues. Since indoor light in these
types of scenes doesn’t change, you can take the picture of the WhiBal
card before, during, or after a shooting session.
Tapes, who is also a photographer, describes the process he uses with
WhiBal cards. “When I shoot in a venue, before I begin the formal
shooting, I go around the venue and take shots of the WhiBal cards in
different areas. I may also take WhiBal shots throughout the event as
well. Or, if I forget to take a WhiBal shot in an area, I drive back the
next day and take the shot then. And that's the beauty of it--it can
happen after the fact.”
JPEG Process For JPEG shooters, you can also save WhiBal settings on media cards. A sports photographer who routinely shoots in two or three stadiums can save white-balance reference settings for each stadium on separate media cards. Then by using the appropriate media card, the white-balance settings can be used when shooting events at each stadium by setting a Custom WB (preset) in the camera. This process saves time since the photographer can skip the white-balancing step while processing the images. But shooting RAW and applying the WB in the RAW converter is much faster and easier.
Note: Not all cameras allow you to save and
use white-balance settings from a media card.
Gray cards can also be used with JPEG capture mode. With JPEG capture,
photographers should use the dark gray for color correction.
The difference between the light and dark gray WhiBal cards is a
technical issue of how the image is presented inside the software. “The
white balance in a RAW file happens during the Bayer interpolation. At
that point the image is black and white and it's in a linear space where
most of the values are in a high range. That's when you want a light
gray value.” Tapes explains.
For JPEG capture, Tapes recommends setting a custom white balance so
that color is spot-on when the camera processes the image internally.
This is a time-consuming but non-destructive process. You can use WhiBal
in post processing by clicking on the WhiBal shot in Levels or Curves
dialogs using the mid-tone eye-dropper. Save the settings and then apply
them to each picture taken in the same lighting. Shooting in RAW capture
mode alleviates both of these methods which do not provide the most
efficient workflow, unless you are shooting in a single lighting
environment. Then a Custom white balance works very efficiently and
effectively, as long as the custom white balance is set with a truly
neutral card like the WhiBal.
However, if you don’t want to set a custom white balance, you can use
the same process of taking a picture of the gray cards and using the
picture during image editing.
If you’re editing a JPEG image in Adobe Photoshop CS2, first open the
image of the WhiBal cards. The open the Curves dialog box
(Image/Adjustment/Curves).Click the Set Gray Point eyedropper in the
Curves dialog box and click the dark gray WhiBal card.
Then click the Save button in the Curves dialog box. In the File Name
box, type a name for the curve, and then click OK. Then open an image
you want to color balance. Open the Curves dialog box, and then click
the Load button. Choose the name of the curve you saved, and then click
OK. Photoshop applies the saved curve to the image. Click OK to dismiss
the Curves dialog box. Repeat this process for each picture you want to
correct.
Do Gray Cards Make a Difference?
To show the difference a WhiBal White-Balance Reference process makes,
here are a sets of images taken in different lighting. The first image
in each set of pictures is taken using Auto White Balance on a Canon EOS
1Ds-Mark II digital SLR. The second image in each set is taken at the
same setting, but is color corrected from the image of the WhiBal cards
taken during shooting.
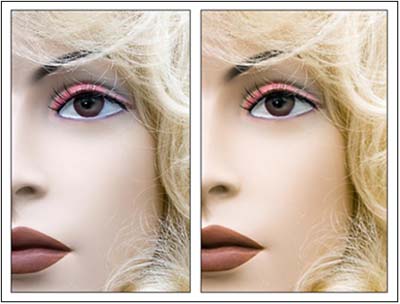
© Charlotte Lowrie. On the left is auto white balance. On the right is the same image balanced using the WhiBal Light Gray card.
These images show the difference in mixed Tungsten and window light.

© Charlotte Lowrie. The top image was made
on the Daylight white balance setting in the camera. The bottom image
was color balanced using the WhiBal gray card.
The card makes less of a difference when the light is very close to the temperature that the camera uses for say, Daylight, as shown above.

© Charlotte Lowrie. The top picture was taken using the Daylight white balance setting in the late afternoon. The bottom picture was color balanced using the WhiBal Light Gray card which reflects the warmth of the early sunset light.
But as the
temperature of light changes to late afternoon, the camera's Daylight
setting becomes less accurate as shown in this set of images.
Conclusion
As you can see from these images, in some cases, the white balance
difference from the camera compared to the WhiBal cards is barely
perceptible, while in other cases the difference is dramatic. From my
experience using the WhiBal cards, I’ve learned that I can consistently
count on true-to-the-subject color when I set the white balance using
WhiBal cards. And, in mixed light scenes especially, the WhiBal cards
save significant frustration when you correct image color.
But more important, any tool that reduces the amount of time I spend on
the computer and that gives me more time to shoot is well worth the
investment. I highly recommend the WhiBal cards.
Note: You can learn more about WhiBal White Balance Reference
Cards on
RawWorkflow.com.
Michael Tapes also has a Video Users Guide that gives additional details
on the background and use of gray cards.
About the author Charlotte Lowrie is an award-winning freelance journalist and photographer based in Seattle. She was the managing editor of Double Exposure magazine. She writes for a variety of newsstand magazines and is an editorial and stock photographer.
(c)
Charlotte Lowrie & Double Exposure Magazine--All rights reserved.
The article and images may not be copied or
reprinted without permission.
|
FastCounter by MSN bCentral |
All images and articles are Copyrighted (c) 2009 WordsandPhotos.org |