By Charlotte Lowrie
(Updated 9/12/12 to include V. 2.0.3 firmware news)
 If you're a Canon 7D photographer, I hope that you've installed Version 2.0 firmware. This firmware is, without question, the most significant firmware Canon has released for any camera since I became a Canon photographer nearly 10 years ago. Most firmware releases fix both minor and major bugs that are discovered after the camera's release, and they may tweak the performance of the camera in other ways. Seldom, however, do firmware releases add new features to the camera. But Version 2.0.0 for the EOS 7D does just that, and suddenly the camera gains features found on newer and more expensive Canon cameras. This firmware extends the life of the 7D and makes an already robust camera even more satisfying to photographers.
And since I posted this article, a new version was released; v.
2.0.3.
If you're a Canon 7D photographer, I hope that you've installed Version 2.0 firmware. This firmware is, without question, the most significant firmware Canon has released for any camera since I became a Canon photographer nearly 10 years ago. Most firmware releases fix both minor and major bugs that are discovered after the camera's release, and they may tweak the performance of the camera in other ways. Seldom, however, do firmware releases add new features to the camera. But Version 2.0.0 for the EOS 7D does just that, and suddenly the camera gains features found on newer and more expensive Canon cameras. This firmware extends the life of the 7D and makes an already robust camera even more satisfying to photographers.
And since I posted this article, a new version was released; v.
2.0.3.
Faster Performance
The first major improvement is faster performance, especially for RAW capture in burst mode. With v. 2, the 7D now captures up to 130 Large/Fine JPEG images or 25 RAW images per burst. While the 7D was no slouch before with a rate of 126 or 94 JPEG's depending on the type of memory card, and 15 RAW images, the firmware offers a modest 3-percent improvement if you use the UDMA Compact Flash (CF) card. But for RAW files, it's the performance bump represents a sizeable 40-percent increase. The bottom line is that if you're a RAW shooter, do not take a pass on this firmware.
The firmware also installs a set of in-camera processing, resizing, and rating options -- options that are also featured in the EOS 5D Mark III and in the EOS 60D cameras. Here is a look at the new features and how to use them.
In-camera RAW Conversion
The in-camera RAW conversion option is handy if you're shooting only RAW images and find that you need a JPEG to post online or to print directly from the card. Here is an overview of the feature and how to use it.
- In-camera RAW-Image Editing. You'll find this feature at the bottom of the Playback 1 camera menu under the name, Raw image processing. Predictably, processing RAW images in the camera offers far less control than processing on the computer, but this is a handy option if you need it. If you process a RAW image in the camera, then the RAW file is left untouched on the CF, and a new JPEG is created and saved to the card. The adjustments you can make during the conversion include adjusting the white balance, Picture Style, Auto Lighting Optimizer, High ISO speed noise reduction, image Quality setting, and color space. The grayed out options -- Peripheral Illumination Correction, Distortion correction, and Chromatic Aberration Correction -- are features that are not available on the 7D even with the Version 2 firmware, but these or similar features are available on other EOS digital cameras. I suspect someone either forgot to delete these options from this screen, decided to leave them in for a future upgrade, or left them in because it was easier.
To convert a RAW image, from the Playback 1 camera menu, choose Raw image processing, and then press the Set button. Navigate to the RAW image you want to convert.
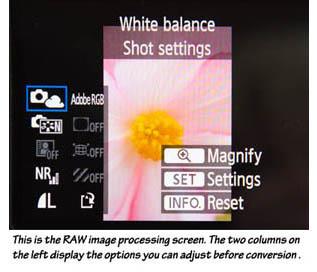 Press the Multi-controller in the center to display the processing options.
Then tilt the Multi-controller to choose the options you want to adjust. Grayed out options can mean that you haven't enabled the function on another camera menu, or the option isn't available on the 7D, as mentioned previously. To display the different choices for an option, press the Set button. Then tilt the Multi-controller to choose the option you want and press Set. When you finish, tilt the Multi-controller to select Save, and then press Set. When the camera displays a confirmation message on saving the image, select OK. Another message appears giving you the folder and file number. Select OK again.
Press the Multi-controller in the center to display the processing options.
Then tilt the Multi-controller to choose the options you want to adjust. Grayed out options can mean that you haven't enabled the function on another camera menu, or the option isn't available on the 7D, as mentioned previously. To display the different choices for an option, press the Set button. Then tilt the Multi-controller to choose the option you want and press Set. When you finish, tilt the Multi-controller to select Save, and then press Set. When the camera displays a confirmation message on saving the image, select OK. Another message appears giving you the folder and file number. Select OK again.
In-camera JPEG Resizing and Image Rating
A new Quick Control screen is available during image playback. And the next set of in-camera adjustment options take advantage of the Quick Control display. To access the Quick Control screen, press the Playback button, and then press the Q button. A two-column list of options appears. Just tilt the Multi-controller to select the option you want. You can choose to protect, rotate, rate, and resize images, to turn highlight alert and AF-point display on or off, and to use the image jump function to quickly browse through images on the CF card.
The new JPEG Resizing and the Image Rating features deserve more discussion.
- In-camera JEPG Resizing. This is another handy option to use anytime you need a smaller version of a JPEG image that is already on the CF card. If you use this option, the camera retains the original JPEG file, and makes a copy of the file at the reduced size that you select. If you shoot Large/Fine quality images, then you can reduce the file to Medium (8 megapixels, 3456 x 2304 pixels) or Small (4.5 megapixels, 2592 x 1728 pixels) size. Of course, if you initially shot Medium quality, then Small is the only option for a reduced file size.
To resize a JPEG file, press the Playback button and navigate to the image you want to resize. Press the Q (Quick Control) button. Tilt the Multi-controller to select Resize, and the turn the Quick Control dial to select the size you want. Press Set. When the confirmation message appears, press Set to choose OK. The camera displays a message telling you the folder and file number of the new file. Press Set to choose OK.
Alternately, you can choose Resize on the Playback 1 camera menu, and then press Set. The camera displays the first JPEG image shot at Large or Medium sizes. On the playback screen that appears, press Set, and then select the size you want on the subsequent screen.
- In-camera Image Rating. This feature lets you rate images using one to 5 stars, or you can use to use no stars which is the default setting. Once you rate the image, you can then browse images on the CF card by rating, and setup slide shows displaying only images of a specific rating. The ratings are recognized in programs including Adobe Photoshop Elements, Adobe Bridge, Canon Digital Photo Professional, and Apple Aperture.
To assign a rating,
press the Playback button and navigate to the image you want to rate. Press the Q (Quick Control) button. Tilt the Multi-controller to select Rating, and the turn the Quick Control dial to select the star rating you want. You can also get to the rating function by choosing it on the Playback 1 camera menu.
Customizing Filenames
 Customizing filenames, another new Version 2 feature, enables you can change the first four letters of image file names and/or to change the first three letters and have the camera automatically append the image size to the filename. You can use this feature in a variety of ways. You might want to identify image files by a specific camera, by a photographer in a multi-camera studio, or by a specific shoot identifier. And you can use any set of letters or numbers that is meaningful for your workflow.
There are two choices for customizing file names:
- Change the first four characters or numbers (User setting 1). This option enables you to choose the first four letters and/or numbers for file names. The camera continues to automatically add the four-digit image number at the end of the file names.
- Change the first three characters and have the camera add an indicator for the file size (User setting 2). With this option, you change the first three characters of the filename, and the 7D automatically denotes the file size using abbreviations: L for full-size JPEG and RAW files, M for Medium size JPEG and RAW files, and S for small JPEG and RAW files. With this
 option, my full-size RAW file would be named _CLL8490.CR2, with "CL" being my initials, and the second "L" indicating full-size RAW size.
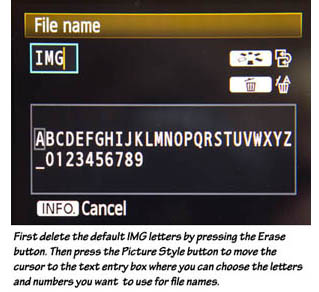
To customize file names, choose File name on the Setup 3 camera menu, and press Set. Choose Change User setting 1 to change the first four letters of the file name. Or choose Change User setting 2 to change the first three letters and have the camera automatically append the file size to the name. Press the Set button. On the File name screen, press the Delete button to erase the letters in the box. Press the Picture Style button to move to the text entry window at the bottom of the screen. Turn the Quick Control dial or use the Multi-controller to select the letter you want, and then press Set. Continue selecting letters and numbers. Then press the Menu button to register the changes.
Then on the File name screen, choose File name, and then select the type of file naming that you want to use. The first option in the fly-out menu is the camera's default file name convention. You can choose any of the three options.
Limiting the Maximum Auto
ISO and More
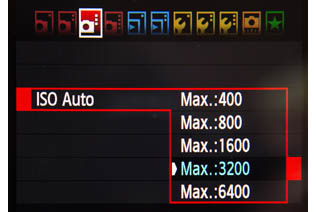 Another new feature is the ability to set the maximum ISO sensitivity that the camera uses when you use Auto ISO. Use this option to set the upper limit on how much digital noise you're willing to deal with when shooting in low light conditions. The choices are 400, 800, 1600, 3200, and 6400. Note that even if you turn on the expanded 12800 ISO setting, 12800 can't be selected for the maximum ISO setting. To set the maximum auto ISO, go to the Shooting 3 camera menu, and then choose ISO Auto, press Set, and then select the maximum setting to be used with Auto ISO.
In addition to these features, you can also manually choose from 64 levels of audio recording adjustments. For audio playback, you can adjust to 11 levels. Certain ambient recording sounds are also reduced, and there is a wind-cut filter as well. The 7D also now provides support for the GP-E2 GPS accessory unit. The GPS unit is attached to the camera via a cable, and then the latitude and longitude is added to the EXIF data. And you can set the time zone and choose whether or not to adjust for daylight savings time.
If you haven't updated your 7D to the new firmware, I hope that this review of new features is enough motivation for you to upgrade. I always recommend keeping the camera current with the latest firmware because very often, Canon can tweak overall camera performance in addition to fixing minor bugs in the camera.
Downloading Firmware
Version 2.0.0
If you want to download the latest firmware, go to the
Canon Web site, and then select the operating system (OS) and the OS version.
You can download the firmware directly to the CF card via a card reader attached to the computer, or download to the computer, and then copy the firmware to the CF card. I prefer the latter method because as the firmware releases progress, I have the last best firmware version backed up on my computer in case anything goes awry with the new firmware. Before you install the firmware in the camera, be sure that the battery is fully charged. During the installation of the firmware, do not touch any buttons on the camera or turn the camera off.
If you are new to installing firmware, then be sure to read through
the 7d-firmwareupdate PDF that is included with the firmware
download.
As I mentioned, the current firmware release is v. 2.0.3. This
firmware fixes a problem where the camera stopped working when the
auto power off setting took effect. It fixes a bug so that now the
camera correctly displays the maximum number of images that can be
captured during a burst of shooting in the viewfinder. And it
corrects errors in the message displayed on the LCD when you save
RAW images that you've converted in the camera.
 I hope you enjoy the firmware and this look at the new features
the firmware offers.
I hope you enjoy the firmware and this look at the new features
the firmware offers.
Also be sure to check out my book, the Canon EOS 7D Digital Field Guide.
Related articles:
Related online courses:
