By Charlotte Lowrie
While the idea of "raw" may sound unappealing in general, when it comes to digital photography, RAW capture is not only appealing, it is perhaps the single most powerful tool available to digital photographers today.
What is RAW capture, and why is it so powerful? RAW capture, an option that is available on many cameras, saves data off the image sensor with minimal internal camera processing. The camera only applies the ISO, shutter speed, and aperture that you set on the camera. Other settings, such as white balance, contrast, sharpening, etc., are “noted” or tagged, but they not applied permanently when the image is saved to the memory card. And therein lies the power of RAW: Because the settings are not applied in the camera, you have the opportunity to change settings such as exposure and white balance after the image is captured. In other words, you a “second chance” to get the best possible image.
The same is not true, however, for JPEG capture. When you set the camera to JPEG capture, all camera settings--white balance, contrast, saturation, color space, and sharpening--are processed in the camera. You get a finished picture that has been processed by the camera's internal software. And, in the process, the image is converted to 8-bit mode (which means that much image data is blown away), and it is compressed (which means that even more bits are blown away). You have a finished file that is much smaller than the original, and a file that leaves comparatively little room (data) to make editing corrections without risking banding and/or posterization.
A Quick Look at the Digital Capture Process
That's a short story, but to understand RAW capture, it’s helpful to look at the digital image capture process. When you take a picture with a digital camera, the intensity of light hitting each photo site on the sensor is recorded as a signal.
Depending on the camera, either 12 or 14 bits of data are recorded. At 12 bits, the camera can record 4,096 levels of brightness. At 14 bits, the camera can record 16,384 levels of brightness. This is referred to as bit depth. The higher the bit depth, the finer the detail, the smoother the transition between tones, and the higher the dynamic range (the ability of the camera to hold detail in both highlight and shadow areas).
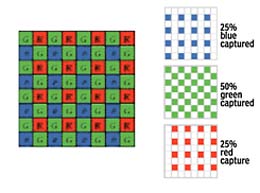 Bayer Pattern Array-- But at capture, digital images are grayscale, not color. To record color information, each pixel on the sensor is covered with a red, green, or blue filter, with the colors alternating. A common arrangement of color filters is the Bayer pattern array that alternates colors, but that also uses twice as many green filters as red and blue. Twice as many green filters are used because our eyes are more sensitive to green.
In simple terms, the information contained in the RAW capture includes the luminance data, the color filter array information, and the camera settings that are tagged in the image metadata. (Metadata is a code file that describes aspects of the image and travels with the image.) To process a RAW image, a converter must interpret the luminance data, color information, calculate any missing color information by borrowing from surrounding pixels--a process called demosaicing--and make other adjustments such as creating a tonal curve, sharpening the image, and applying noise reduction.
The image data can converted either in the camera using the camera’s built-in software, or it can be saved to the memory card in its unprocessed, or raw, form.
JPEG Processing-- If you set the camera to JPEG or TIFF capture mode, then the camera processes the image before saving it to the memory card. The image is processed according to the exposure and image parameters set on the camera. The camera also converts the image to an 8-bit file; a conversion that permanently discards levels of brightness that you may want and need during image editing. At the end of the day, you’re left with a finished image that has a scant 256 levels of brightness plus some artifacts introduced during the JPEG compression process.
The RAW file-- However, if you set the camera to RAW capture mode, then the camera uses the ISO, aperture, and shutter speed set on the camera, and it tags the settings such as white balance, contrast, sharpness, and so on in a header file that travels with the image data. Depending on the camera, the camera may also compress the image data. If compression is used, it’s done without data loss and without the introduction of artifacts. Then the camera saves everything to the memory card. At the end of the day, you’re left with an unprocessed image that is rich with data and ripe with opportunity for you to choose how the image is interpreted.
In this scenario, the advantage is that no brightness levels have been discarded, and no color interpretation has been done. As a result, you can decide for yourself the tones you want to preserve and how you want to interpret the color when you convert the RAW capture. Because the camera only tagged key settings, you have the opportunity to drastically change or to simply fine-tune settings such as exposure, white balance, contrast, and saturation during conversion.
Plus key steps in converting the image such as linearization of the data and color conversion can be done on the computer which offers more processing power, space, and more powerful and sophisticated algorithms than are available in the camera. And the RAW conversion process is done on the pristine, high-resolution image in a non-destructive way—much the same as if you had set the camera with these settings when you took the picture. The result is a file that offers more latitude and stability in making adjustment than is possible with a JPEG file.
RAW images, with their rich data depth, give you much more to work with during conversion and subsequent image editing. In addition, RAW files are more forgiving if you need to recover highlight detail.
The following table, which assumes a five-stop dynamic range, illustrates the difference in richness between a RAW image and a JPEG image.
A Comparison of Brightness Levels
| Brightness Levels Available |
12-bit RAW Capture |
8-bit JPEG Capture |
| First f-stop (brightest tones) |
2,048 |
69 |
| Seocnd f-stop (bright tones) |
1,024 |
50 |
| Third f-stop (midtones) |
512 |
37 |
| Fourth f-stop (dark tones) |
256 |
27 |
| Fifth f-stop (darkest tones) |
128 |
20 |
There are a couple of important take-aways from this table. First, it shows that capturing that first stop of data provides fully half of the entire data. This means that a very slight overexposure with digital capture ensures that the camera will capture the large amount of data contained in the first f-stop. And second, the table illustrates how much more data you have to work with in a RAW capture than with a JPEG file.
How do I know if my camera offers RAW capture? Many of the advanced compact, prosumer, entry-level and pro-level digital SLRs offer the option to shoot in RAW mode. You can find out if your camera offers RAW capture by looking for a RAW option on the appropriate camera menu or by checking the camera manual.
For example, entry-level digital SLRs including the Canon EOS Digital Rebel and Nikon D70 offer RAW capture. Some cameras may offer a variation of RAW such as RAW Compressed. While compression has a bad name in general for dropping off pixels to save space on the memory card, RAW compression typically does not have the same effect, and it offers the same advantages as non-compressed RAW capture.
RAW Conversion Programs
At the heart of RAW capture are the conversion programs that display and allow you to convert RAW images. Images captured in RAW mode include unique filename extensions such as .crw for Canon files, .nef for Nikon files, .orf for Olympus files. But because RAW data is stored in proprietary format, you need a program that can display and convert the RAW image. You can use the camera manufacturer’s RAW conversion program, e.g., Nikon Capture Editor, Canon’s Digital Professional Pro conversion program, or a third-party RAW conversion program such as Phase One’s Capture One, or Adobe Camera Raw.
Note: Because there are different proprietary RAW formats, how and where metadata (information about the image) is stored is up to the individual manufacturer. For many good reasons, Adobe is championing a standard RAW file format called DNG which provides much-needed standardization. DNG is gaining ground in the battle to win industry acceptance. Hasselblad has already announced their support for DNG.
What to expect from conversion programs While RAW conversion programs offer more and more tools and options with each new release, there are familiar image-editing tools that you won’t find in RAW conversion programs including cloning, healing, or history brushes, filters, gradient mapping, or the ability to work with layers in the traditional sense. Most conversion programs rightly focus on basic image conversion tasks including white balance, exposure, shadow control, brightness, contrast, saturation, sharpness, noise reduction, and so on.
Manufacturers and third-party companies usually build in backward compatibility to their RAW conversion programs. This means that pictures taken years ago can be opened and reprocessed using new features in the latest version of the software. In other words, you can give new life to older images with successive upgrades to the conversion program.
Many RAW conversion programs offer batch editing and the ability to save the correction or balance files for future use. Both options are very useful and represent significant time savings. You can also set options in a RAW conversion program to match your color and printing workflow.
Note: If you're shooting in RAW mode, and your camera captures 12- or 14-bit images, it is a good practice to do as much image correction as possible with the high-bit-depth files. The higher bit depth represents more data to work with—data that you need because image edits are, by nature, destructive. And after a RAW image is converted, I suggest completing the editing process in an image-editing program that supports 16-bit files such as Adobe Photoshop.
Which RAW Program Should I Use?
RAW conversion programs are available from camera manufacturers and from third-party companies. I've used several different RAW conversion programs, and they vary in their ease of use and robustness of features. It pays to download a trial version and evaluate the options first. Third-party programs such as Adobe Camera Rawand Phase One's Capture One are robust, full-featured, and support a wide range of different cameras.
Some camera manufacturers provide their conversion program at no charge. Canon falls into this category. Others provide a trial version CD in the camera box and charge a fee to purchase the program. Be sure to check for prices and details on the manufacturer's Web site.
If you're considering a third-party program, first ensure that the program supports your camera's RAW files. If it does, compare price and features to the manufacturer's program and other third-party programs. In many cases, third-party conversion programs offer as many, or more features as the manufacturer's software. For example, Adobe Camera Raw offers an advanced option for correcting chromatic aberration, or color fringing around objects set off against a bright background.
However, there is an on-going debate on whether conversion results are better using the manufacturer's conversion program or a program from a third-party provider. Some argue that because the manufacturer has the "source code" for the camera and knows various sensor and lens characteristics, the manufacturer's processing algorithms are best. Others argue that they get the best results using third-party programs.
Since many programs can be downloaded at no cost for a trial, it is a good idea to try programs you're considering and compare features, ease of use, and final image results.
RAW in Action
For a better idea of how RAW capture and conversion works, I'll walk through a RAW image conversion using the latest version of Adobe Bridge and Adobe Camera Raw. This example illustrates basic RAW image adjustments--adjustments that can be applied to one or a series of images.
One of the key advantages of Adobe Camera Raw is the ability to adjust one RAW image in a series of images taken under the same lighting conditions, and then quickly and easily apply those adjustments to other images in the series, as shown here.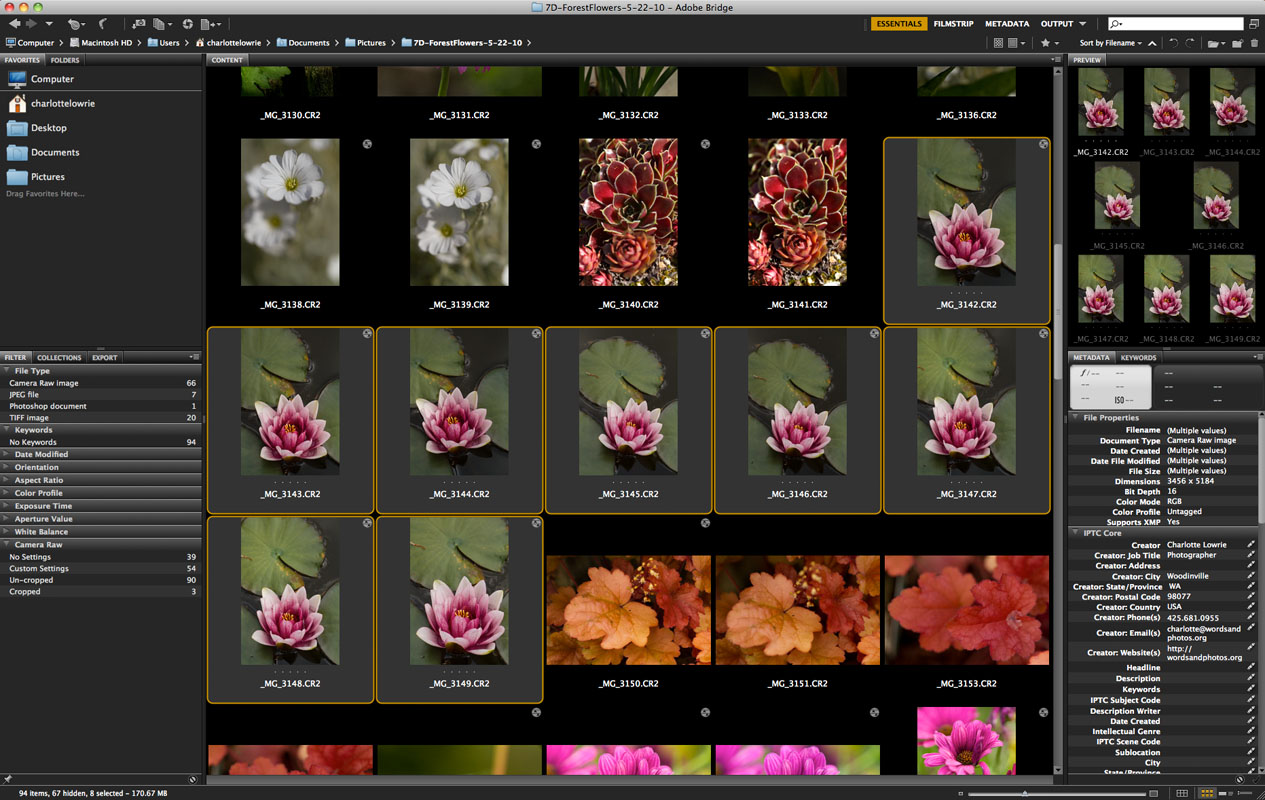
1. In Adobe Bridge, hold down the CMD/CTRL key as you click each RAW image that you want to process, and then right-click one of the selected images, and then click Open in Camera Raw from the fly-out menu.
Camera Raw opens in filmstrip mode and displays the first, or ‘selected’ image in the preview area. Images are displayed in a film strip along the left side of the window.
2. Adjust the White Balance by dragging the Temperature slider to the left for a cooler (more blue) temperature, or to the right for a warmer (more yellow) temperature. Then adjust the Tint slider to the left to shift the tint toward green or to the right to shift the tint toward red. Alternately, click the White Balance tool in the Toolbar, and the click an area in the image that should be white or middle gray. Here, I used the White Balance tool to click a bright edge of the water lily, and then I moved the Temperature slider to the right to warm up the overall colors.
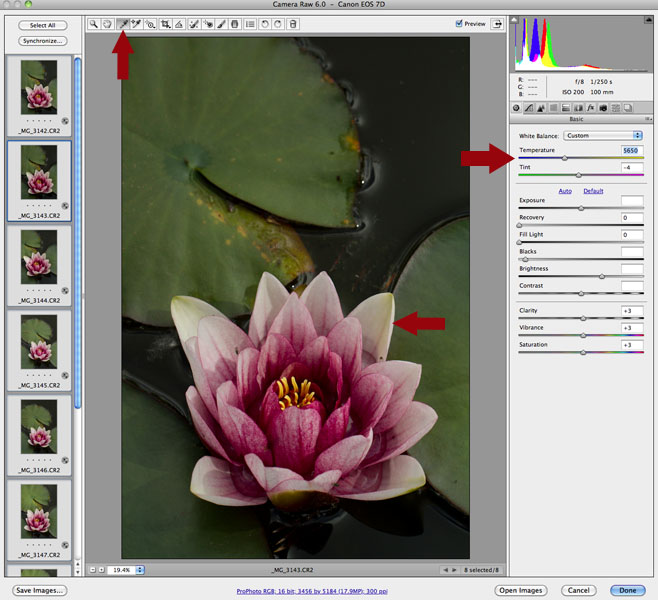
3. Drag the Exposure Slider to the right to increase the exposure, or to the left to decrease it. This adjustment sets the white point--the brightest pixels--in the image.
Tip: To avoid clipping, or discarding pixels, as you adjust the exposure, hold down the Option/ALT key as you move the Exposure slider. Camera Raw displays clipping in white. To avoid clipping, back off slider adjustments until highlights, except specular highlights, disappear into blackness.
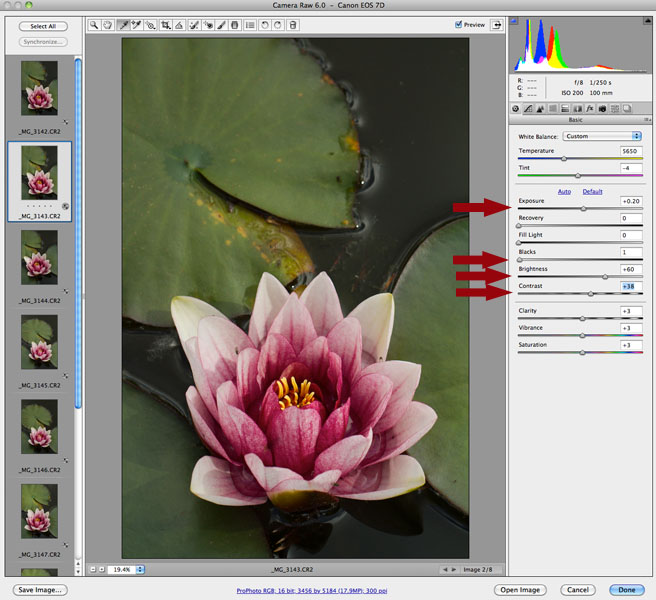
4. Drag the Blacks slider to the left or right. This adjustment sets the black point in the image.
Tip: You can hold down the Option/ALT key as you move the Shadow slider to display clipping. This display works like the Exposure clipping display except that when adjusting Shadows, drag the slider to the left until the image is totally, or almost totally white.
5. Drag the Brightness slider to adjust the midtones. This adjustment does not change the white point or the black point. It only brightens the midtones.
6. Drag the Contrast slider to the left to decrease contrast or to the right to increase contrast.
You can browse through the tabs in Camera Raw to make other adjustments such as setting the tonal curve as shown below.
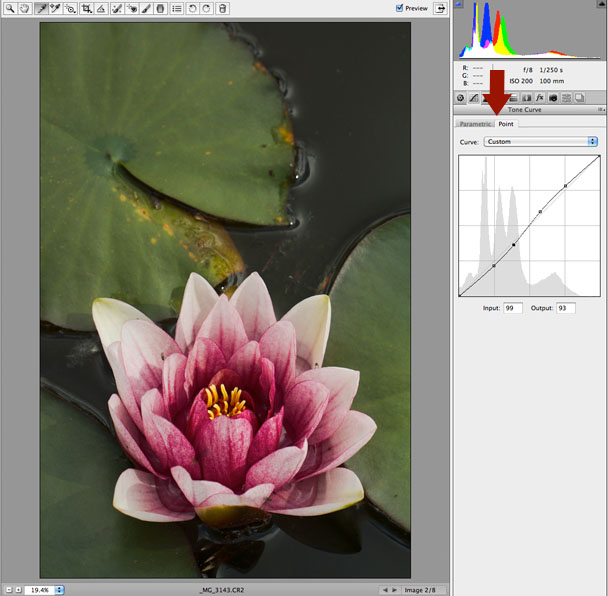
7. This completes the basic image adjustments for conversion of the RAW image. You can also adjust sharpening, correct lens aberrations and vignetting, tweak the tonal curve, and adjust the shadow tint using the controls offered on the Adjust, Detail, Lens, Curve, and Calibrate tabs respectively.
8. Now you can apply all or part of the adjustments to all or some of the images in the filmstrip. To apply adjustments to all open images, click the Select All button. To apply the adjustments to selected images, hold down the Command/CTRL key as you click images in the film strip.
Note: The currently selected image is displayed in the filmstrip with a darker border.
Once additional images are selected, Camera Raw activates the Synchronize button.
9. Click the Synchronize button. Camera Raw displays the Synchronize dialog box where you can choose to apply all of the adjustments you made, or you uncheck options that you don’t want to apply to the other images.
10. When synchronization is complete, you can click:
* Save to save all the images in the series,
* Cancel to discard changes, or,
* Done to save the adjustments and have them appear the next time you open the RAW image in Camera Raw.
As with most software programs, there multiple ways to accomplish the same task, and that’s also true for applying image adjustments from one file to multiple files in Adobe Camera Raw. The advantage of the Synchronization technique is that all the images that are likely candidates for batch processing are open in a single place and are displayed with reasonably large image previews. This makes it easy to quickly run through synchronized images to see if any need further tweaks.
As you can see, RAW capture opens the door to powerful post-capture options that give you exceptional image quality.

Related articles:
All images and articles are copyrighted by Words and Photos and may not be reprinted without permission.
Contact: charlotte@wordsandphotos.org
