By Charlotte Lowrie
There are many times when you need to use a flash, but if you're like many people, you're never quite satisfied with the resulting images. Flash technology has made great strides in the past five years. In fact, many new Canon EOS cameras include a built-in wireless flash transmitter. The transmitter controls one or more Canon Speedlites wirelessly from the camera's built-in flash unit. While the transmitter offers many advantages, including the ability to control the output of individual Speedlites from the camera, you can get much better flash images whether or not your EOS camera has a built-in transmitter. In a future article, I will detail using the built-in wireless flash transmitter, but for this article, I'll keep talk about a few simple ways to get better flash images regardless of which camera you have.
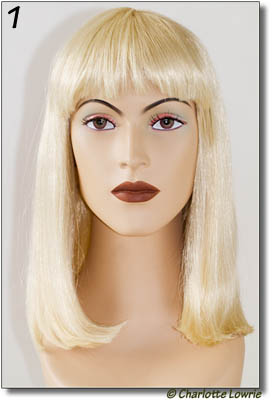 While the built-in flash is handy when you need an extra bit of light on the subject, it doesn't produce the most appealing images. For example, if the subject is near wall, a dark flash shadow inevitably outlines the subject spoiling an otherwise decent image. And if the light is low, the flash output increases creating the overly bright and artificial lighting and a darker background shadow. Both of these effects are evident in image 1.
Using Only the Built-in Flash
Image 1 was shot with the built-in flash with the camera in vertical shooting orientation on a tripod. Several windows to the left contributed diffused natural light to the image. A large silver reflector was on the right side of the mannequin (who I've named "Jane"). The exposure was ISO 100, f/5.6, 1/20 second.
The easiest way to reduce the background shadow is to apply some negative Flash Exposure Compensation (FEC). In Image 2, I applied a -2 EV (stops) of FEC.
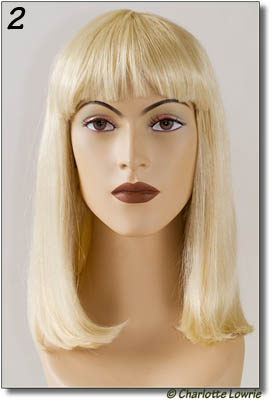 In Image 2, the overall exposure is reduced due to the reduced flash output. As a result the shadow is much less obtrusive, and the highlights in the hair retain better detail. The light on the face is still acceptably bright but without an overly bright appearance. The exposure is the same as for Image 1, with the only difference being a reduced flash output. Here are some other ways you can use to help reduce the background shadow including:
- Moving the subject far from the background, or moving the subject where there is no flat background, such as outdoors.
- Shooting straight on to the subject and with the camera in horizontal orientation so that the shadow falls behind the subject and is mostly hidden.
- Adding light to the background. In studio shooting, I always light the background separately to eliminate background shadows.
- Use a flash diffusion accessory such as a Stofen cap or the LumiQuest Soft Screen both of which fit over the built-in flash and soften the edges of shadows. Both are inexpensive, handy accessories to have on hand.
Some photographers use a polarizer on the lens to reduce the glare created by flash lighting. I haven't tried this myself, but intend to in the future. I'll update the article with my impressions of this technique.
A disadvantage of the built-in flash is the tiny pinpoint-size catchlights in the subject's eyes. While those catchlights are hard to see on Jane (who has painted in catchlights), I'm sure you've seen them, and they are very unattractive. I typically clone them out in Photoshop during image editing.
 Using One Canon Speedlite
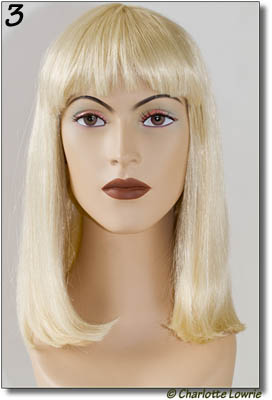
The next easy option is to replace the built-in flash with a more powerful Speedlite that spreads the light more, and is, of course, a better option if you're photographing a group of people. For Image 3, I had the Canon 580EX II Speedlite on the camera with no modifications to the flash.
In this image, the shadow is lighter, and it is larger in size. The exposure for this image was ISO 100, f/5.6. 1/20 second, the same as for the built-in flash. With a live subject, you'd want a faster shutter speed. Increasing the ISO to 200 or 400 would provide an acceptably fast shutter speed. The lighting is nice, and a bit brighter on Jane's face than in Image 2, but there is still the telltale bright flash look. However, the bright look could be toned down using some negative FEC on the Speedlite.
To get more pleasing results, I added a second Canon 580 Speedlite. I set the flash units to Multi. I set the 580 EXII Speedlite (mounted on the camera's hot shoe) to Master. Then I set the 580 Speedlite to slave mode. (Check your Speedlite manual to see how to set the flash unit to master and slave.) With the camera was on a tripod and the master flash on the camera's hot shoe, I hand-held the second flash. At this basic level, both flash units used E-TTL II, and they fired at the same output level.
Using Two Speedlites
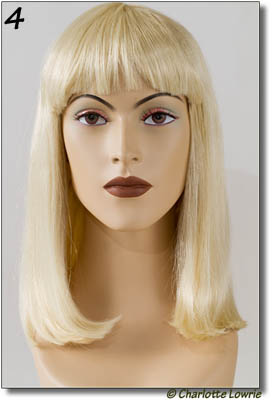
For Image 4, I held the second flash to the left of Jane, at a 45-degree angle and above eye level. It is essential that the slave Speedlite has line-of-sight to the master flash. So I adjusted the flash head to face the subject with the red light part of the flash facing the on-camera master flash. In Image 4, the flash shadow is eliminated, but the high angle of the second flash created an unattractive shadow under the chin. The shadow could be reduced or eliminated by using a sliver reflector at waist level and tilted up, or by adjusting the position of the second, handheld flash. There is still nice "modeling" of facial features. The exposure for this image was the same as for the other images.
 With Speedlites, you have the advantage of being able to set the flash units in groups and then controlling the output of each group by setting ratios. Setting output ratios enables you to create classic lighting patterns. But for this article, I want to keep things very simple with a minimum of adjustments to the camera and to the Speedlites.
Also, I used the flash units that I happen to have after upgrading flash units over the years. Canon has introduced several newer, smaller, and less expensive flash units that make it much more affordable to have multiple flash units.
The beauty of Speedlite photography is that you can replicate studio lighting with a very portable system of one, two, three, or four flash units. As you continue shooting, you can also add affordable light stands, umbrellas, and other light modifiers that make it easier for you to set up lighting patterns.
I used the Image 4 lighting setup for this picture of one of my miniature Schnauzers, shown here. The exposure for this image was ISO 100, f/5.6, 1/8 second. I converted the image to black-and-white using Nike Silver Efex Pro 2, a program that I highly recommend.
Note: I use Jane for these examples because she hangs around in the studio, doesn't ask for a salary, and never talks back. And for a photographer who doesn't have live-in family, it's sometimes hard to get a model on short notice.
