By Charlotte Lowrie
I got my start in photography during the film era when I worked as a reporter/photographer for a daily newspaper in Texas. Back then reporters did it all—the interviews, writing the story, taking pictures, and then rushing into the darkroom to develop and print the film. And all of it had to be done by the printing deadline to make it into the next day's edition. From then to now, I've always loved the look of film—whether it's black-and-white films such as Kodak’s Tri-X or films developed later including Kodak Portra and FujiFilm's Velvia.
Times changed, and while I welcomed the move to digital, I still sometimes miss the look of film. Each film had a different character, and
photographers could choose specific films to help convey the story that
their pictures were telling. Nostalgia is one thing, but today it's critically important to create images that stand out from thousands of other images
that are available to buyers. To remain competitive, I am always looking for ways to give my images a different
and creative look—looks that help express my vision for my images
and that help convey the story. During a recent online class, the instructor mentioned demonstrated how she uses Alien Skin Exposure 6 to get her signature look for portraits.
I was intrigued enough to check around about the
Alien Skin products. Then I got the opportunity to try out Alien Skin's
Exposure 6 plug-in for Photoshop. After a few weeks of use, I was hooked. Exposure 6 is
a feature rich program, and it may take me weeks or months to discover all the options it offers. But backing up to the beginning, Exposure 6, along with the other Alien Skin programs,
is easy to install, and you can install the programs as plug-ins so that they open from within Photoshop, Lightroom, or Aperture. Or you can install the
programs to use as standalone programs outside of Photoshop or other programs. I use Exposure 6 within Photoshop, and it has become a regular part of my workflow after only a few weeks of working with it.
As I shoot stock images for assignments, Alien Skin's Exposure 6 program has helped me get a variety of get different looks and treatments for the assignment
images. For example, a client requested images for a book. They needed images of a plain, wooden box with a latch or lock. The storyline was that the box had been hidden, and it held a stash of secret letters that would change the lives of those involved. I had a wooden box, so I got busy shooting. Then for editing, I used Exposure 6 to help create a look that enhanced the storyline. I wanted to ensure that the images had a sense of mystery. I set up the box on what looked like a shelf in an attic or old closet. This shelf also had a light fixture with a chain pull nearby so I put a small blue bulb in the light fixture. Then I placed a silk scarf on top of the box to make it seem that the box was partially hidden.
The out-of-camera images looked okay, but they fell a little short of what I had imagined. When I got the images into Adobe Camera Raw, I used the Temperature and Tint sliders to create an even cooler color temperature than the original shots, but the images still didn’t look
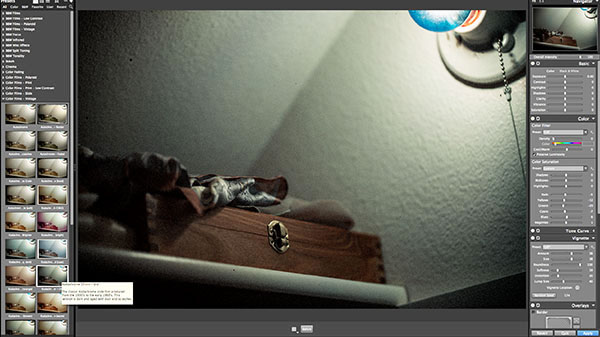
like what I wanted. I brought the images into Photoshop, and then opened the Exposure 6 program. (The Alien Skin plug-in appears on the Filter menu after you install it.)
In Exposure 6, I began by browsing the Presets under Color Films – Vintage. As I clicked each preset, the large preview image changed to reflect the selected film.
 By now, I knew that I could either accept the preset as is, or I can use the tools in the
dock on right-hand side of the screen to adjust any of the effects used in the preset. For example, I chose Kodak 35mm – Old option, but I didn’t want the grain to appear in the image. So under Grain in the
in the right-hand dock, I set the Overall Grain Strength to 0 (zero). And just that quickly, the grain was gone.
By now, I knew that I could either accept the preset as is, or I can use the tools in the
dock on right-hand side of the screen to adjust any of the effects used in the preset. For example, I chose Kodak 35mm – Old option, but I didn’t want the grain to appear in the image. So under Grain in the
in the right-hand dock, I set the Overall Grain Strength to 0 (zero). And just that quickly, the grain was gone.
With Exposure 6, you can see the adjustments used to create the option you choose. And you can then adjust the settings to make any changes you want, such as deleting an image border, reducing the opacity of a texture, or adjusting the contrast to name only a few. In the
dock on the right side, you can adjust: Exposure (Exposure, Contrast, Highlights, Shadows, Clarity, Vibrance, and Saturation), Color Filter, Color Saturation, Tone curve (choose from a drop-down menu with presets or adjust to a custom curve), Split Toning, vignette, Overlay, Light Effects, Texture, Focus, Grain, IR (Infrared), and Bokeh. Once you make adjustments, you can save them for future use—a great way to create your signature style for portraits, still life, weddings, or whatever you shoot most often.
The look I wanted for the first picture was complete, so I accepted the changes, made a few more adjustments in Photoshop, and posted this as one picture for the assignment. Within a day, the client had short-listed
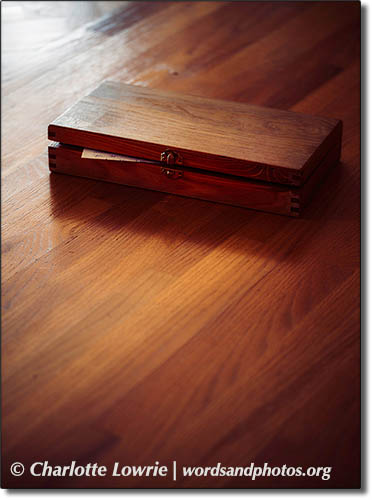
one of my images. As I thought more about the story, I realized that the secret box of letters would eventually "come to light." And since the client wanted some images of the box in the floor, I did a second shooting session with the box sitting in partial light and partial shadow.
This time, I used Exposure 6 to enhance the warm colors of the hardwood floor and the box. Since the image would be used with text, I left space at the top and bottom for the text. For the warm version of the box, I used the Kodachrome 35mm Faded (creamy bright modified) option and adjusted the tonal curve so that one side was shadowy to indicate mystery. The other side of the box had an old letter peeking out from under the lid, and I had placed that side in partial light. And to cover my bases, I did another version with a blue color tint—again using Exposure 6. 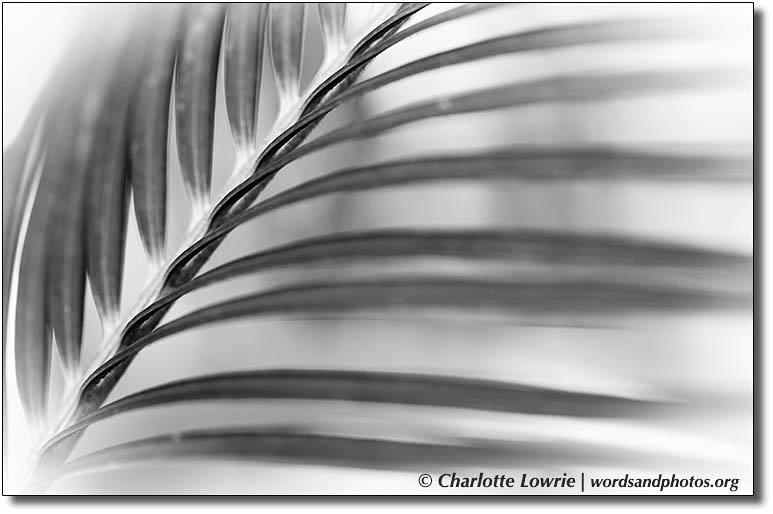
 And to satisfy my nostalgia,
Exposure 6 offers is a Tri-X 400 film look that I used for the fern image
above. In fact, the monochrome options in Exposure 6 are a treasure
house of great looks for black-and-white renderings. I'm excited to continue using Exposure 6 as an integral part of my workflow, and I highly recommend it.
And to satisfy my nostalgia,
Exposure 6 offers is a Tri-X 400 film look that I used for the fern image
above. In fact, the monochrome options in Exposure 6 are a treasure
house of great looks for black-and-white renderings. I'm excited to continue using Exposure 6 as an integral part of my workflow, and I highly recommend it.
Also be sure to check out my book, the
Canon EOS 70D Digital Field Guide.
Related articles:
