By Charlotte Lowrie
Capturing water drop is one of the most challenging photography assignments, and it's a great way to develop your patience. Here is water drops shot that I captured recently.
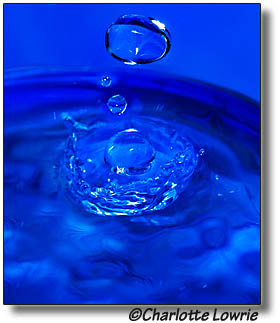 These droplets were photographed with a Canon EOS Rebel. The Rebel is relatively slow at 3.5 frames per second (fps) when compared to the EOS 40D at 6.5 fps, but it’s possible to use this technique with the Rebel and the built-in flash. And for this type of subject, the built-in flash recycle time is as important as the speed of the camera’s drive system. The recycle time of the built-in flash on the Rebel is 3 sec. But from my experience, the recycle slows down the longer that the flash is used continuously. An accessory Speedlite is a better option if you have one. But as I said, you can use the built-in flash—just be patient and let it fully recycle before continuing to shoot.
If you have the time, patience, and inclination, here’s how to photograph water droplets.
• Background. Find a colorful backdrop for the water. For this image, I used a thin film-like waterproof plastic that I bought at a hobby store. I lined the kitchen sink with the plastic so that folds and wrinkles were not visible in the frame. Set up the background so that it is tall enough for drops that jump high in the frame.
• Water container. Setup a clear water container. For this shot, I placed a clear drinking glass under the water faucet. A clear, glass pie plate would work equally well.
• Tripod. You’ll be using manual focus, and you don’t want to change it constantly, so having the camera on a tripod keep the focus sharp through a series of images.
• Lens. I have used a wide-angle lens and the Canon EF 100mm f/2.8 Macro USM lens, and either lens works well. For a shallow Depth of Field, I prefer the 100mm lens.
• Shooting mode & exposure. Set the camera to Tv mode. The sync speed on the Rebel XSi is 1/200th sec., and that’s what I used for this shot. The exposure I used was: ISO 100, f/2.8, 1/200th sec. using the EF 100mm f/2.8 Macro lens.
• Manual focus. Set the focus switch on the side of the lens to MF (Manual Focus). Now hold a pencil across the setup at the point where the drips and drops will appear, and focus manually on the pencil. Once you set the focus, you can leave it unless the drip distance changes enough to throw off the focus. So check the LCD and magnify the images periodically to ensure tack-sharp focus.
• Built-in flash. Pop up the built-in flash, and begin shooting. For the shot shown here, I was shooting at night, and I turned out the overhead room lights and used only the flash. This helped reduce the number of specular highlights on both the water and the background. With the XSi or the 40D, using the flash autofocus assist beam worked perfectly to help me time the shots in an otherwise dark room.
Timing, of course, is everything. Expect to get a lot of throw-away shots, but then expect to get those great shots that make the effort worthwhile.
Related articles:
